Working with Groups
Guidance for working with groups in Learn, including importing and exporting groups, and managing self-sign-up groups.
Looking for Help with Learn?
From the beginning of the 23/24 academic year, all new courses will be delivered using an updated Learn interface. In order to ensure that users can access support materials for current and previous year courses we have kept old support materials on Edweb pages and created a new Sharepoint Learn site full of useful resources for the new interface.
For Learn resources for current courses, please visit the Learn Sharepoint (University of Edinburgh users only).
Here you can access the most up-to-date information such as:
- Good practice guidance
- Training and support resources
- How to guides
To access support material for older courses please use the pages below as usual.
Using Groups in Learn - Some Tips
The printable pdf below gives detailed instructions on the following:
- Using Groups
- Importing Groups and Group Members
- Group User Management
- Exporting Groups
Group Tool & User Management
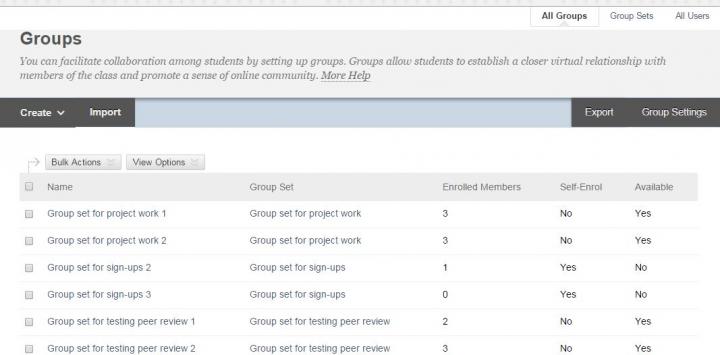
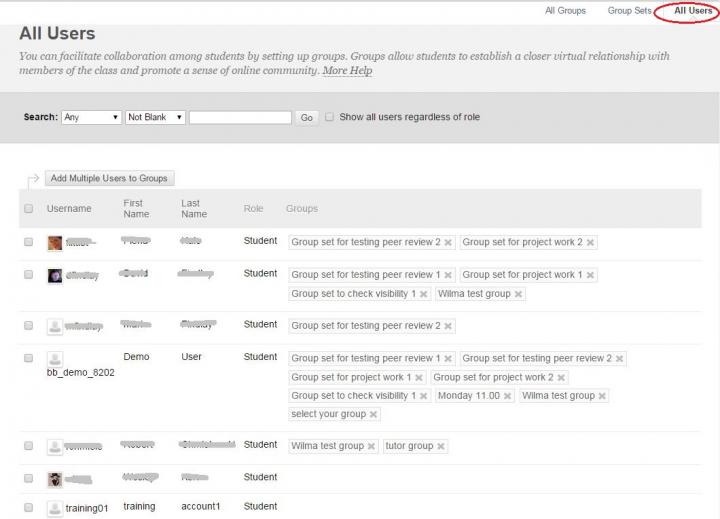
Learn has a group overview panel which provides instructors with a number of tools to manage groups. There is an All Users option which allows instructors to manage user group access.
From the Control Panel, select Users and Groups, and then select Groups.
This tool allows you to create, import and export groups and sets of groups. Tabs give you access to manage group settings (type of group, dates, tool availability etc) and group membership.

Giving students access
Students can be given access to groups in several ways:
- My Groups appears under the Course Menu, and each group a student is enrolled in, appears there automatically.
- Groups Page link. The instructor can add this tool link to the Course Menu or a Content Area. This links to a page listing all available Groups for that student, including sign-up sheets for Self-Enrol Groups.
- The Instructor can add a link to a single Group or sign-up sheet in a Content Area. Use Tools > Groups to select the link to the group or groups you want.
Instructors must use the 2nd or 3rd option to provide a link to a sign-up sheet for a self-enrol group - by definition, they do not appear in “My Groups” until the student is enrolled.
Showing other groups to students
Once a student has signed up to a group in a group set, the other groups in that set are not visible to that student.
Once a group in a group set is full, that group is no longer visible to other students as a sign-up option.
Therefore if staff wish all students to continue to see all the group options, they should post a list of the options as well as the sign-up links.
Import and Export Groups and Members
Users can create groups by importing a csv file. The csv file is split into columns which can either be populated or empty (if the csv file doesn’t meet the criteria the import will fail). Groups can be populated by users by importing a csv which meets specified criteria. There are templates below which you can edit as a spreadsheet, save in .csv format, and import.
Instructors can export either groups, groups members or both, to a csv file. This file could be edited and uploaded into other courses.
Group Codes
Groups codes are unique identifiers used strictly for import purposes. You may reveal a column in the interface to see the group codes, but you cannot edit group codes after group creation.
To reveal the group code to be used for importing you will need to toggle the View Option for "Show/Hide Group Code". This option is located just above the first row of the group table.
It is important to check your group code before performing an import as if they do not match your import will fail. Group codes may not always follow the format that you are expecting so should be checked as part of your workflow.
Seeing who is not in Groups
Learn’s built-in Group Manager lets you see and manage the membership of groups. The “All Users” view allows you to add users to groups singly or in bulk, and you can search for individual users.

However staff sometimes need to see and export a list of students who are not in a group or set of groups, and this can be time-consuming to select from the screen above.
So you may find it easier to set up a rule in the Grade Centre:
- Go to the Full Grade Centre
- From the Manage drop-down list, select Smart Views
- Select Create Smart View
- Give it a name and description
- You can Set as a favourite to have the Smart View appear on the sidebar menu for the Grade Centre
- Leave Selection Criteria at Course Group View
- Leave User Criteria at Group, and set Condition to “not Equal to”
- Select the groups you wish to check - they do not have to be a group set, you can select all, or any combination
- You can set the display of results to give you only the Grade Centre columns you are interested in.
- Submit your criteria
When you select the Smart View, it will give a list of students not currently in any of the selected groups.
This view can them be downloaded in the same way as any grade centre view, via the Work Offline option.
This Smart View can be edited to include or exclude additional groups as you wish.
Adaptive Release
You can use group membership to restrict access to specific content areas, assignments and other activities from within your course. You can change the availability of these items in the course from the Adaptive Release tools in your context menu alongside the item or area.
Removing groups
Warning
Deleting a group will delete all work associated with that group. You should make the group unavailable instead of deleting it, if you need to keep work created using the group tools.
If you wish to delete a group or group set, you can do this through the Control Panel > Users and Groups > Groups.
Select the checkbox next to the group or groups you wish to delete, then select Delete.
If there are any grade centre columns associated with the group, you will have the option of retaining the column and any associated marks. But note this will still delete the actual student work within groups tools.

