Booking Form - An in-detail guide
Study Desk Booking System User Guide
Overview of the System
In response to students’ requests limited bookable study spaces are located within the reading rooms on Floor 5 (silent/PG areas) of the Main Library.
- There are 65 bookable spaces available to PG Students only, in the Red zone on the 5th Floor, and 104 bookable spaces available to all Students in the Blue zone on the 5th Floor
- Each student will have a quota of 12 hours a week, however bookings made the same day will not count towards this quota.
- Bookings can be created and managed using an online webform or the University SeatEd@UoE mobile App.
- The webform has also been designed to work well on a mobile screen
- When you arrive at your pre-booked desk you must check-in:
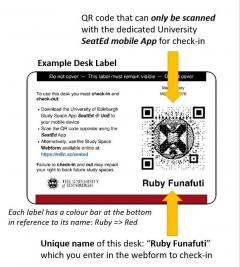
- Each desk has a special label with QR code you can ONLY scan with the SeatEd App, and a unique name, positioned below the QR code, that you enter on the webform (see the Example Desk Label below).
- When you leave the desk you must check-out, again using the webform or SeatEd App.
- The system verifies that you can use the desk and logs your check-in and check-out
-
Unique name of this desk: “Ruby Funafuti” which you enter in the webform to check-in
Remember… Check In - Check Out
There are three main menu options on this page:
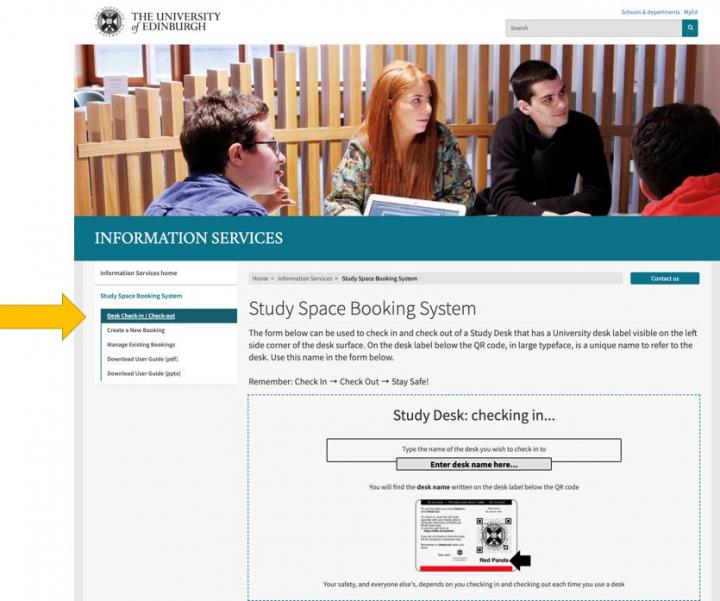
- Desk Check-in / Check-out
- Create a New Booking
- Manage Existing Bookings
We will start with how to Create a New Booking, then describe the Manage Existing Bookings form, and finish with the Check-In / Check-Out procedure
Create a New Booking
The form (pictured opposite) contains selectors for your booking search. You can make selections for:
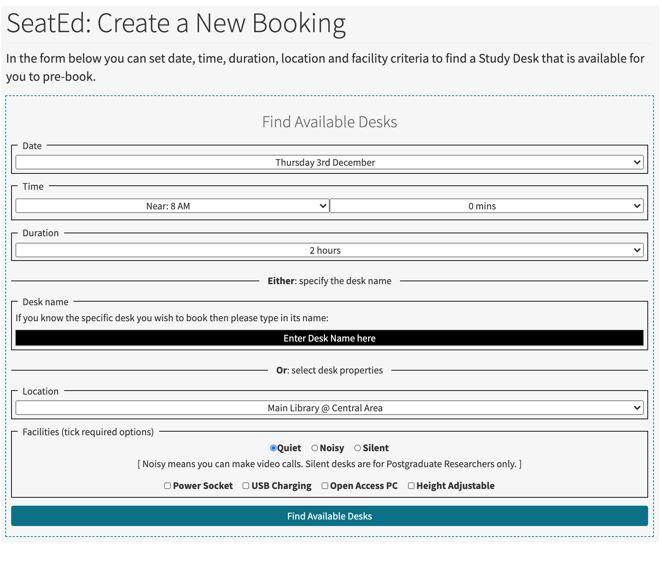
- Date, start time and duration;
- University building location (now including campus wide selection);
- Type of desk, which can be Quiet for normal solo study, or Noisy for when you need to make a video call and talk
- Note that Silent desks are reserved for Postgraduate student use only
- and certain desk facilities you may require such as a power socket
- Do not select Open Access PC unless you absolutely require it
Once you have made your selections then simply press the Find Available Desks button at the bottom of the form
Find Available Desks
-
A search will return, in just a few seconds, up to five suggested booking options listed vertically (see opposite)

- Each desk (name top right), the start time (top left), date and its location information is presented in a separate booking option box
- At the bottom of each booking option box is a Book Desk button
- Press the button on your preferred option to book that desk at the given start time
- Its always possible the options you are seeking to book are not available, because for example, they may have already been booked up on the given date by other people.
- You may also have reached the maximum bookings you can make under your quota. Your quota is defined in terms of:
- The maximum number of days in the future you can make a booking (one week for standard bookers and two weeks for priority bookers)
- The total number of hours you can book per week (20 hours maximum).
- The system will always present the closest matching options to your search specification it can find
- Study desk booking start times are at different offsets from the hour for different desks, to help mediate the flow of people in to and out of the study desk location.
- Its important that you consider taking one of the options that is offered even if its not your exact match. Study spaces are in high demand and it is simply not possible for everyone to have their most preferred option all of the time.
Manage Existing Bookings
-
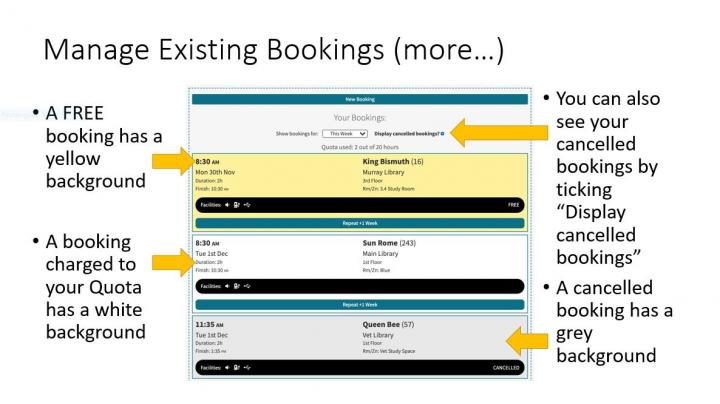
All your bookings for This Week, Today and future weeks can be seen on the Manage Existing Bookings form
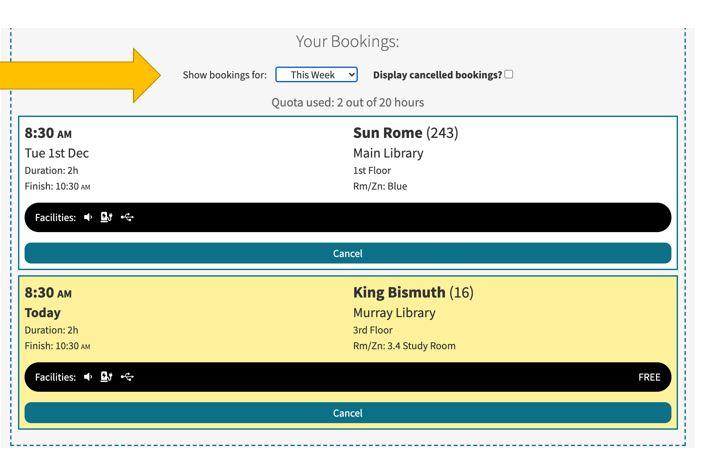
- There is a drop-down selector which enables you to switch between these views
-
Shown at the top of the form is your booking quota and how many hours of bookings you have made for the calendar week selected.•By default you will have a maximum of 20 hours of advance bookings you can make for each calendar week.•By default you will be able to make advance bookings up to 7 days in advance.
- If a booking is shaded yellow (as the King Bismuth in the screenshot), this represents a booking made Today, based on available desks. ‘Today’ bookings do not affect your 20 hour per week quota
- From here you can cancel an individual future booking by clicking on its Cancel button
- When you attend your booking you must check-in to your desk at the start time (not before) and check-out again just prior to the finish time
Step 1.

Type in the name of the desk written on the desk label below the QR code in large type (in our case the desk is called Moon Rabbit), and press the enter/return key on your keyboard
Step 2.
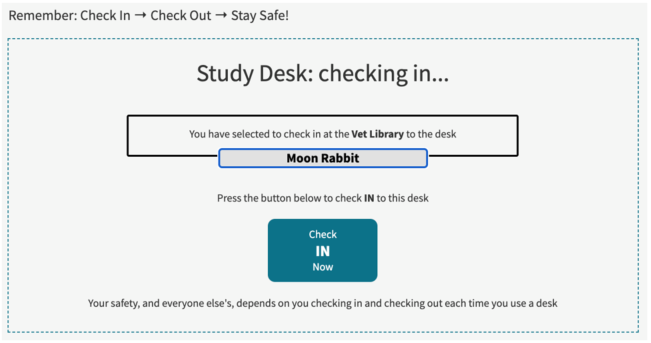
If the desk is available to you then you will progress to the next step, where a Check IN Now button will be displayed – press the button…
Step 3.
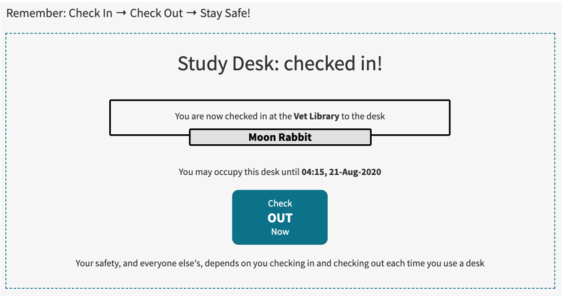
You have successfully checked in. The end time of your booking will be displayed. You must check out no later than this time. When you have finished using the desk, you must check out, simply press the Check OUT Now button…
Step 4.
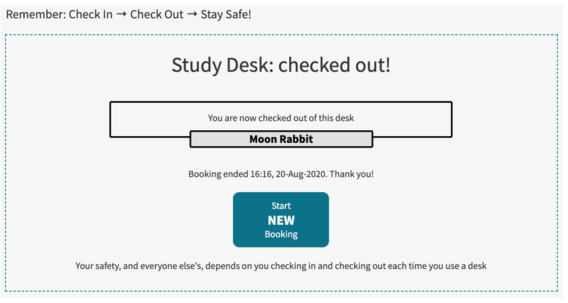
You have successfully checked out. When you want to check into another desk you can simply press the Start NEW Booking button and you will go back to Step 1.
Simple Rules
-
You must always check-in to a desk you are about to use and always check-out when you are finished
-
Do not arrive at a desk before the start time of your booking – you cannot check-in until your booking starts
-
If you know you are not going to be able to use your desk booking, please cancel it in advance – this enables someone else to make use of the desk, and enables you to make another alternate booking
-
Please pack up and leave your desk a minute or two before the end of your booking so that the next person to use the desk can safely start their booking on time
-
Ensure you abide by any desk cleaning protocol that may be in place at the desk location
-
Note that you cannot be checked-in to more than one desk at a time – you must checkout when you are leaving a desk
-
Note that Silent desks are reserved for Research Postgraduate student use only – do not book these if you are not a Research Postgraduate student.
-
Do not cover the desk label or place things on it – this will help preserve the lifetime of the label
-
Do not scan the QR code with anything other than the University SeatEd App – this is available from Google and Apple app stores – you can also use the mobile friendly webform at: https://edin.ac/seated
-
If you have any technical problems with the system, please contact UNIDESK@ed.ac.uk
Why do we need a Study Desk Booking System?
-
Study spaces have always been in high demand at the University
-
A booking system for study spaces has been considered to mediate demand fairly for the student population
- We hope you find the system useful and welcome your feedback. Please email us at iot@ed.ac.uk with any comments.

