Chat, Teams, Channels, Apps and Settings
Guidance and videos about using chat, teams channels and connecting apps.
What is Chat?
Chat spaces are for private chats between individuals and small groups of colleagues. You can use the chat space of Teams in place of emails for most types of communication, as the chat space allows for instant communication with others at the University.
Teams Tip: For ad-hoc chat with your colleagues create a new chat space before deciding if a Team is needed.
What can I do with Chat?
Start new chats
To start a new chat click the "New chat" icon (icon of a pen and paper)
- You can create individual or group chats.
- We recommend you have no more than 20 people in a group chat (certain features of chat are disabled beyond this)
How to start new chats in Teams
Access recent chats
You can pick your recent chats back up by clicking them in your recent chat list.
Video and audio call in chat
Audio/video calls allow you to have face-to-face conversations from your Chat space in a more ad-hoc way than scheduling a meeting. This can be useful if you are discussing something in chat, as a quick call can be easier than typing many messages back and forth.
How to use the video and audio call feature in Teams
Pop Out Chats
You can pop out individual chats in Teams by clicking the pop out chat button beside your Chat. This allows you to have a chat open in teams at the same time as working on other things.
Create tasks from chat messages
Note - to use this feature you must have the Tasks by Planner app added. To add the tasks by planner app:
- Click the "More added apps" button (ellipsis icon) from the navigation bar
- Then, type "Tasks by Planner" in the search bar
- Then, click "Tasks by Planner" when it shows up
- You can then keep the Tasks by Planner app on your navigation bar by right-clicking (or CTRL + right-clicking) on it and selecting "Pin".
When you receive a chat message that you relates to something you need to do or ask someone about, you can add this as a task. To do this:
- Hover over the chat message
- Then, click "More options" (ellipsis icon) when it appears to the top right of the chat message
- Then, hover over "More actions" (ellipsis icon) at the bottom of the list
- Then, select "Create task"
- A box will open allowing you to change the title of the task, edit the notes, select what planner you want to add it to, add a due date etc.
- Then, click "Add task"
Reply to specific chat messages
You can reply to specific chat messages by:
- Hovering over the specific message you want to reply to
- Clicking "more options" (ellipsis icon)
- Select reply
Add "Live" components
Live components in chat allow you, and the other users in your chat to work collaboratively on that component within your chat message. For example, if you add a "Checklist", you and the other users in the chat can all add to that checklist together.
To add a fluid live component:
- Open the chat you want to add it to
- Under the "type a new message" box, select the "Live components" button (icon of 3 squares)
- You can chose to add a bulleted list, a checklist, a numbered list, a paragraph, a table or a task list
- All other users in your chat will then be able to edit that component of your message
Pin chats
You can pin a particular chat message to the top of the chat window below the title. This means that everyone in the chat will always see this message clearly. This feature may be useful if there is an very important message in the chat that you want everyone to have easy access to.
To do this:
- Open the chat
- Hover over the message
- Click "More options" (ellipsis icon)
- Select "Pin"
- The message will appear at the top of the chat window
How do I access, share and collaborate on files in Chat?
Accessing chat files
There are 2 ways that you can access files in chat:
- By finding the message the file was attached to
- By clicking the "Files" tab along the top navigation of the chat window (this will be beside the "Chat" tab)
#TeamsTip - You can also access all of the files added to your chats and to your Channels, by clicking the "Files" tab on the left navigation bar of the Teams window.
Attaching files to a chat message
You can attach files to your Chat message by clicking "Attach" (icon of a paperclip) below the message box. You can either choose to upload the file from your device, or from your OneDrive.
This file will then be attached to your message, and will be uploaded into the "Files" tab of the Chatspace.
Collaborating on files in chat
When you add a Word, PowerPoint or Excel file to a Chat, everyone in your chat can edit that file collaboratively and it will be automatically saved. Locate the file either by scrolling through the chat messages, or by finding it under the files tab, and click it to edit it.
You can find more in-depth help with collaborating on files in Teams from the link below:
How to collaborate on files in Teams
Downloading and getting share links for files from chat
To download a file from a chat, locate the file in the chat list (or under the files tab) and click "More options" (icon of 3 dots) to the right of the file and click "Download".
You can get either a Teams or OneDrive link from files in your chat. Locate the file in the chat list (or under the files tab) and click "More options" (icon of 3 dots) to the right of the file. Then, select "Get link", select either Teams or OneDrive link and copy the link.
How can I keep my chat list organised?
Name your group chats
We recommend that you name your groups chats to keep your recent chat list organised. Give your group chats as informative a name as possible, so that you can recognise the chat easily instead of seeing a list of names.
Pin Chats
You can pin chats to stay at the top of your recent chat list. You may want to pin the chats that you use most often so that these are easily accessible at the top of the list.
Hide Chats
You can hide chats from your recent chat list. You may find this useful if you have a lot of chats and your chat list is starting to get cluttered. You could hide any chats that aren't currently active (for finished projects etc).
For help with hiding chats see:
Can I get more help with Chat?
For more detailed help with Chat have a look at the LinkedIn learning video on the topic (requires you to sign in with your University log-in details):
Use Chats for private messages
You can also read Microsoft guidance on chat:
What are Teams?
A Team is a group of users who work together on an ongoing basis across a range of issues and topics. Your Team space is your hub for collaboration and conversation.
The following video from Microsoft shows some of the basic features of Team spaces:
How can I join a Team?
Teams you are already a member of
Teams you are a member of show up under the Teams icon on the navigation bar.
Teams you are not a member of
Join a Team by clicing the Teams icon and clicking the "Join or Create Team" button.
Then:
- Type the Team code in the "Enter a code" box or
- Search for the Team you are looking for or
- Ask the Team owner to add you
For more help with joining an existing Team, watch the LinkedIn Learning video on this topic (requires you to sign in with your University log-in details):
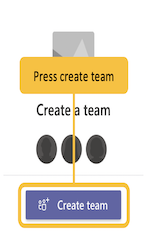
Can I create a Team?
You can create a Team yourself by clicking Join and Create then Create a Team.
Microsoft provide guidance for creating different types of Team:
You can also view the LinkedIn Learning video on creating Teams (requires you to sign in with your University log-in details):
Help with creating Teams and adding members

Selecting a Team type
You will be asked to select which type of Team you want to create.
Detailed information on the differences between Team types is available from Microsoft:
Differences between the Team types
What do Team spaces look like?
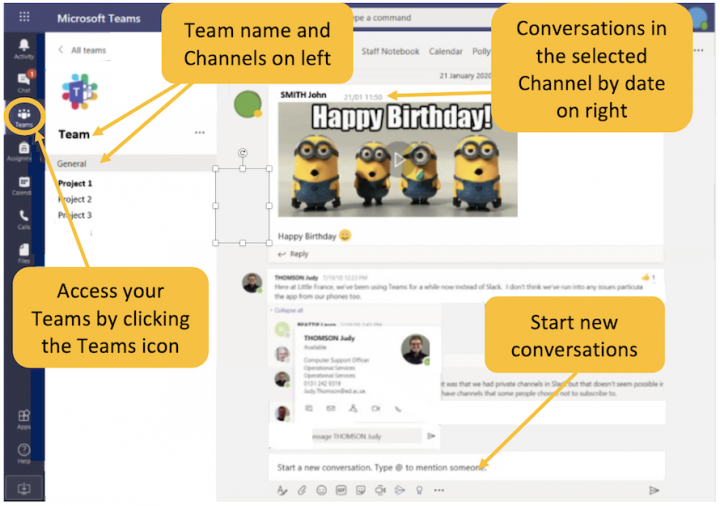
On the left of the Teams window is:
- your Team icon
- your Team name
- your Team Channels
On the right of the Teams window is:
- the Channel you have selected
Can I get more help with Teams?
What are Channels?
Channels are sections within your Team that organise your conversations.
The following video by Microsoft gives an overview of Channels:
How do I access Channels?
You access Channels by clicking on your Team, then clicking the Channel
How do I navigate Channels?
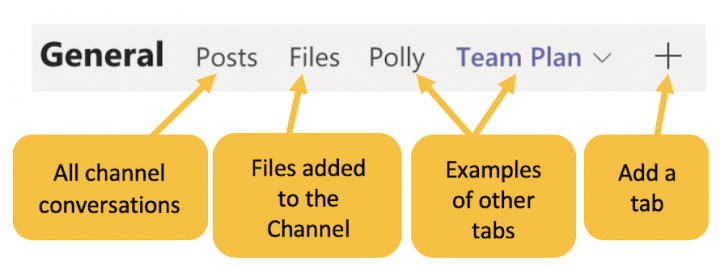
The bar along the top of the Channel allows you to navigate it.
- Posts - shows all the conversations in the Channel
- Files - shows all files added to the Channel
- Other tabs - these tabs will show any apps added to your Team, for example, Polly (a quick poll app) or Planner.
- + (Add a tab) - this allows you to add apps to your Channel
When you have unread posts in a Channel, the Channel's name will be bold in your Channel list and may show a red notification.
Teams Tip: Files added to your Channels are stored in the Team SharePoint site.
Can I create Channels?
Teams Tip: If you need to create a Team keep it simple, and let the conversations decide the need for more Channels.
Microsoft provide detailed guidance on how to create Channels in the link below:
Can I create a Private Channel?
Private Channels can only be seen by the members of the Team invited to them, and are labelled with a lock beside their name.
We recommend that you limit the creation of Private Channels to the following:
- All colleagues to be added to the Private Channel are Team members, as if they are not all members of your Team it would be better to create a group chat
- Information in the Channel needs to be kept private
- You need more privacy controls over sensitive files or content, as a SharePoint site is created for each Private Channel.
Note - Breakout rooms do not work in meetings in private channels. You should only host meetings in which you will not need breakout rooms in private channels.
Teams Tip - Private Channels cannot be changed to standard Channels after creation, and similarly Standard Channels cannot be made Private after creation.
How to create Private Channels
Guidance on private Channels in Teams
What can I do in Channels?
Have conversations in Channels
Teams tip: You don’t need to create a Channel to chat with individuals, for this you need a to create a New Chat. Conversations in Channels are for chat with your whole Team.
Starting a conversation
To start a Channel conversation type your post in the "start a new conversation" box.
Some features of Channel conversations:
- @mention: @ the Channel name to get everyone's attention
- Set your post as an announcement: Click "format" (icon of an A and a pen), then click "New conversation" in the top left and select "announcement"
- Set your post as important: Click "format", then click the 3 dots and select "Mark as Important"
-
Add emojis, stickers, files and gifs to your post
-
Cross-post to other channels: Click "format", then click "Post in multiple channels" and select them
For help with Channel conversations, please have a look at:
Guidance on @mentioning, announcements and important posts
Cross-posting to different channels
Guidance on adding emojis, gifs and stickers
Replying/Reacting to other's posts
- To reply to a post: Click reply at the bottom of the post (if there is no reply button replies have been disabled to this post). Make sure to click reply if you want to reply to another person's post rather than creating a new conversation.
- To react to a post: hover your mouse over the top of the post
Add files to Channels
You can attach files to your Channel conversation either by clicking "attach" (paperclip icon) or by dragging a file into the "start a new conversation" box. The file will then be attached to your channel post, and will show under the channel "files" tab along the top navigation bar of the Channel.
Files added to your Channels are stored in the Team SharePoint site, which all Team members can access
There are various things you can do with your files when they are added to your channel:
- When you send a Word, Excel or PowerPoint file to a Channel, everyone in your Team can collaboratively edit your file
- You can copy a Teams or SharePoint link to the file to pass on to others
- You can download the file
Within the Channel's files tab you can:
- Organise files into folders by selecting the "new" then "folder" buttons
- Make a specific file a channel tab (making it appear along the top navigation of the channel)
- Pin the file to the top of the list
- Check out the file
- If you have a Class team, you can add files to the pre-made "Class materials" folder, so that students in the team can only read these files but not edit them.
Note - before sharing some files, you may have to grant permission for users to view and / or edit the file. Microsoft are adding an update soon that will let you know to change permissions before sharing the file. In the meantime you will have to check this yourself.
For further information on files in Channels, please have a look at the LinkedIn Learning videos on Sharing and collaboating on files in Teams (this requires you to sign in with your University of Edinburgh log in details):
Guidance on sharing and collaborating on files
You can also have a look at Microsoft's guidance on files:
Add Apps to Channels
Adding apps to Channels can add different types of functionality to your Channel. You can add OneNote notebooks to take notes with your Team, you can add a website to access it easily, and a SharePoint site.
Further information on Apps is available below.
Add a shared calendar to a Channel
You can add a shared calendar to your Channels. This feature makes it easy for members to see scheduled channel meetings, as any meeting scheduled in the channel will be automatically added to the calendar. Team members will be able to add appointments / events to the calendar and everyone will see these.
To do add a shared calendar:
- Open the channel you want to add a calendar to
- Then, click the "add a tab" button (plus icon) along the top of the channel window
- Then, type "Channel calendar" into the serach bar and select "Channel calendar" when it shows up
A new tab "channel calendar" will be added along the top of the channel. All team members will be able to see the events in this calendar.
Note - this feature is not available for private channels.
Create tasks from channel posts
Note - to use this feature you must have the Tasks by Planner app added. To add the tasks by planner app:
- Click the "More added apps" button (ellipsis icon) from the navigation bar
- Then, type "Tasks by Planner" in the search bar
- Then, click "Tasks by Planner" when it shows up
- You can then keep the Tasks by Planner app on your navigation bar by right-clicking (or CTRL + right-clicking) on it and selecting "Pin".
When a channel message is posted that you relates to something you need to do or ask someone about, you can add this as a task in a planner. To do this:
- Hover over the channel post
- Then, click "More options" (ellipsis icon) when it appears to the top right of the channel post
- Then, hover over "More actions" (ellipsis icon) at the bottom of the list
- Then, select "Create task"
- A box will open allowing you to change the title of the task, edit the notes, select what planner you want to add it to, add a due date etc.
- Then, click "Add task"
Can I get help with Channels?
In depth help with Channels is available from LinkedIn Learning (requires you to sign in with your University log-in details):
LinkedIn Learning videos on Channels
Microsoft also have in depth guidance on Channels:
What are Apps?
Many apps (both Microsoft and third party) can be added to and used from Teams. These apps can be added as a tab in your Channels and Chat spaces to allow you to use that app collaboratively in the Channel or Chat.
Important Information about Apps
We recommend you use the apps already available through the Recent list under the "Add a tab" button in your Team Channels because these meet certain requirements (for example these will be Microsoft apps, Polly, the website add in, or other apps that you currently use).
However, you can add other apps. If you are adding an app to Teams you should complete your own due diligence that the app meets the University of Edinburgh's data protection and information compliance policies. You should ensure that the app is legitimate, that the developer is reputable and check other people's experience with using the app.
Please also speak to your Data protection champion:
Data Protection Champions (Wiki site, requires University log-in details)
How do I add apps to Channels and Chats?
Add apps as a tab in your Channel or Chat
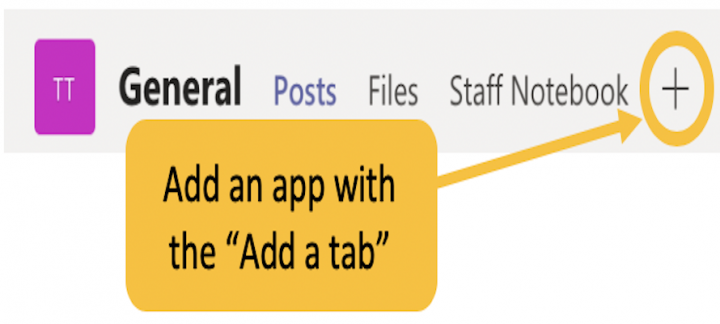
You can add an app as a tab in your Channel or Chat by clicking the + icon along the top bar of the Channel or Chat.
For further information on adding tabs to your Channels in Teams, view the LinkedIn Learning video on this subject:
Microsoft also provides guidance on adding apps to Channels and Chats:
How to add Apps to Channels and Chats
Add other apps to Teams
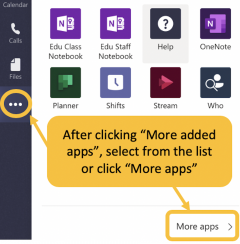
To search for other apps or to add a personal app/bot click "More added apps" (icon with 3 dots) on the navigation bar and choose from the list of apps.
Here you will find many apps that may be useful, however, please ensure you complete due diligence before adding them.
For information on adding apps to Teams, including information on what apps can add to your Teams, have a look at the LinkedIn Learning video on this topic:
Use apps to add extra functionality
What apps can I add for extra functionality?
There are many apps that you can add for extra functionality, however the 3 below are provided as examples.
Tasks by Planner
Teams Tip: Integrating Planner with your Team allows for simple task management without having to leave the Teams space.
Microsoft Planner can be added as an app to your Team space. You can add and edit plans, assign and manage tasks and see progress and priority charts within the Teams app. You can also add chat messages or channel posts as tasks in your planner, by hovering over the message or post and selecing "create task".
If you want to learn more about Planner in Teams, have a look at Microsoft's guidance:
Microsoft Forms
Forms can be added as an app to your Channels. Forms allows you to create simple polls and gather feedback within the Teams conversation space. Please check the Mircosoft's guidance:
How to add Forms to a Team Channel
You can also add Microsoft Forms as an app to your Teams meetings. This allows you to run polls in your meetings. To do this prior to the meeting taking place:
- Double-click your meeting in the Teams calendar
- Then, click the "add a tab" button (plus icon) along the top bar of the meeting details
- Then, click Forms
- Then, click "Add"
- Then, click "Save"
You can now add polls to your meeting.
Linking a SharePoint site
Teams Tip - The SharePoint tab works with Modern view SharePoint sites but not Classic view SharePoint sites.
You can link your published SharePoint sites and lists as tabs in your Team Channels. The members of your Team can then view your SharePoint pages and add comments within Teams. There are a number of ways you can do this:
- Add "SharePoint" as a tab in your Channel - if your SharePoint site is a Modern view site you can add your SharePoint as a tab by following the steps above to "Add a tab to your Channel" and selecting SharePoint.
- Add "Document library" as a tab in your Channel - this tab will link directly to the document library of your SharePoint. This tab works for both Classic and Modern view sites.
- Add "Website" as a tab in your Channel - if you have a Classic view SharePoint site but want a tab that is similiar to the "SharePoint" tab you should use this. This allows your classic view SharePoint site to be embedded as a tab in your Channel.
Insights app
The insights app is an app for Teams created by Microsoft to help users balance productivity and well-being. You can use this app to take breathing breaks, send praise to colleagues, schedule focus times when your chats are muted to help concentration and set up a virtual commute to remind you to finish work at a specific time.
To add the Insights app:
- Click "More added apps" (ellipsis icon) on the left navigation bar
- Then, type "Viva insights" into the search bar
- Then, click "Insights"
- You can then pin the insights app to your navigation bar, by right-clicking (or CTRL + right-clicking) on it and selecting "Pin".
Can I change my availability in Teams?
Change your Availability Status
Your availability status in Teams is the coloured circle that shows beside your profile picture. It is important to set your availability status in Teams so that your colleagues know if you are busy or if you do not want to be disturbed.
Help with changing your availability status and what you should change it to is available here:
How to change your availability status
LinkedIn Learning video on availability status
Set your do not disturb priority settings
When you have your availability status set to do not disturb you will not receive Teams notifications, except for the priority notifications which you have set to appear.
You can change these priortiy notifications:
- Click the "Settings and more" menu (3 dots icon) to the left of your profile picture
- Next, click "Settings" and a settings box will appear
- Then, click "Privacy" from the list on the left of the settings box
- Next, click "Manage priority access"
Set your status message
You can add a status message in Teams that will show when someone messages you. This message can let your colleagues know if you are unlikely to reply straight away and when you will be available.
Microsoft have step-by-step guidance on setting your status message:
How to set your status message
Schedule your out of office in Teams
A new feature is rolling out now to Teams, which will allow you to schedule your out of office in Teams.
Microsoft provide step-by-step guidance on how to do this:
How to schedule your out of office in Teams
Can I change my notification settings?
-
Click the "Settings and more" menu (3 dots icon) to the left of your profile picture
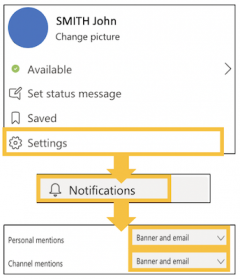
- Then, click "Settings" and a settings box will appear
- Next, click "Notifications" from the list on the left side of the box
- Then, click the drop down arrow beside each notification to change them
Hint -"Notification sounds" setting - If you have a meeting you may wish to change this setting to "Off". If notification sounds are left on people in your meeting will hear them.
Turn message previews off for chat messages
You can now turn off message previews for your chat messages, helping to ensure your chat messages are kept private.
To do this access your notifications settings as above, and click the toggle beside Show message preview.
More help with notification settings
For more information on changing your notification settings in Teams, please have a look at the LinkedIn Learning training on the topic (requires you to sign-in with your University log-in details):
Microsoft also provide detailed information on changing your notification settings:
Sometimes the amount of messages received in Microsoft Teams can be overwhelming, therefore it is important to consider some Teams etiquette.
- Consider your colleagues' working hours before messaging or scheduling a meeting with them
- Check the scheduling assistant tab- When scheduling a meeting within the Teams calendar, remember to check the scheduling assistant tab to make sure your colleagues are available at the time you want to have the meeting at
- If you want a colleague to see your message, it may be useful to @ message them.
- Always check your colleague's availability indicator before you message them - If they are set to busy or do not disturb could your message wait until they are available?
- Pay attention to your colleague's status message that may show when you try to message them - Read their status message (this will appear above the "Type a new message" box) before messsaging them as they may indicate that they will not be available that day or if there is a specific time they are available
- Make sure to set your own availability status and status message - This lets your colleagues know when you are active on Teams and when you are busy working on another task and may not get back to them straight away. Guidance on how to set your availability status and message can be found in the "Settings" section above.
- Change your availability status to do not disturb when you only want to receive high priority notifications - You set up your own priority access notifications (shown in the "Settings" section above), allowing you to work without notification interruptions from Teams, except those that you want to see.
- Set your out of office message in Teams or through Outlook - When your out of office is on in Outlook, your Teams avaliability will be set to Out of Office, and your colleagues will see that when they try to message you. You can also set your out of office directly within Teams through "General settings".
- Don't expect colleagues to get back to you with an answer straight away - Just like with email, it may take your colleague some time to read and reply to your message, especially when they are not set to Available.

